Have you ever swiped through an Instagram post and felt like the images flowed together without any breaks? That magical effect, where one image transitions into the next in perfect alignment, is known as a seamless carousel. This type of post is a wonderful way to showcase your creativity, tell a story, or highlight multiple images in an eye-catching way. If you’ve ever wondered how to create this kind of carousel or when you should consider using one, you’ve come to the right place. In this guide, we’ll explore the basics of Instagram carousels, when they’re most useful, and how to craft a captivating, seamless set of slides that will have your followers begging to see more.
An Instagram carousel is a post that contains multiple images or videos in a single upload. Instead of seeing just one photo in your feed, you’ll see a stack of images that you can swipe through. A user can include up to ten slides in each carousel. These slides can be photographs, graphics, or even short video clips. This feature has been around since 2017, and it quickly became popular because it gives you more space to share content.
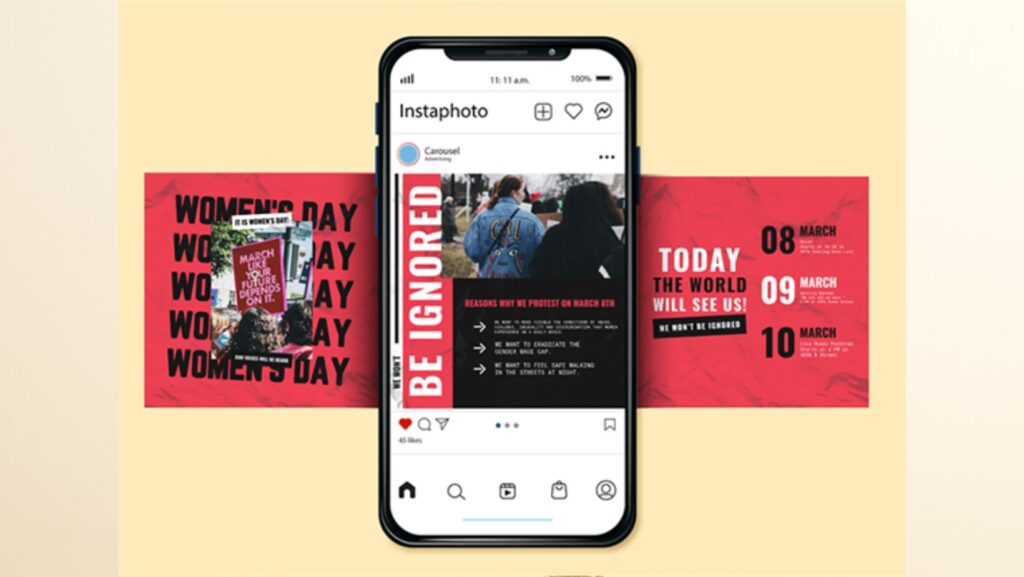
You might have seen carousels used for storytelling, product showcases, or before-and-after transformations. There’s also a special kind of carousel called a seamless carousel, which takes this concept to the next level. In a seamless carousel, the images line up in such a way that the dividing borders between slides look invisible. When you swipe, it seems like you’re seeing a long, continuous graphic.
When to Use an Instagram Carousel
There are many situations where an Instagram carousel can be a big plus. Maybe you have a special event with several pictures you’d like to share in one go. Or perhaps you want to show an entire collection of products without overwhelming your audience with separate posts. Here are a few scenarios where using an Instagram carousel really shines:
Storytelling: If you have a narrative to share, such as a short recap of a trip or an illustration of your brand’s journey, a carousel provides a chronological progression. Each slide can represent a step, making your story easy to follow.
Tutorials and Step-by-Step Guides: Carousels are a wonderful way to create a visual walk-through. Each slide can be a different phase in the process, and your audience can follow each step at their own pace.
Product Showcases: If you have multiple items to show off, a carousel allows you to feature each product in a single post. You can include close-ups, different angles, and even user-generated photos.
Before-and-After Comparisons: Posts that compare different stages of a project, like renovations or design makeovers, gain a lot of traction because they’re visually striking. A carousel makes it simple to feature these comparisons in an organized way.
Engagement Boost: Carousels naturally encourage swiping, which can lead to more interactions and help you get more views. If you space your story or content out across multiple slides, people will often stay on your post longer, boosting your engagement metrics.
Why the Seamless Approach?
A seamless carousel is a creative twist on the regular carousel. It involves designing your images so that they form one larger visual when viewed side by side. Imagine a panoramic shot of a city skyline stretched out across three or four slides. Each swipe reveals a new section of the image without any obvious breaks.
This approach draws people in because it feels like there’s more to discover with each swipe. It’s also highly shareable. People enjoy showcasing unique or clever posts, and a seamless carousel definitely fits that description. By mastering this technique, you can offer something new to your followers and spark a conversation around your post.
Step-by-Step Guide to Creating a Seamless Carousel Post
So, you’re sold on the idea, and you want to create your very own seamless carousel. Here’s a step-by-step breakdown:
Plan Your Content
Before diving into design, think about what you want to show. Is it a large image you want to split into multiple slides, or is it a series of connected graphics? Make sure the concept lends itself to a longer layout.
Create a Canvas
You’ll need a specific canvas size that can be divided evenly for Instagram’s standard proportions. Each individual square image on Instagram is typically 1080 x 1080 pixels (width by height). If you’re doing multiple slides, multiply 1080 by the number of slides you want. For instance, if you plan on having three slides, your total width will be 3240 pixels. Keep the height at 1080 pixels, so your full canvas might be 3240 x 1080 pixels.
Design for Flow
When building your graphics, try to ensure that elements move smoothly from one slide to the next. You can place a large image that spans all slides, or you can design smaller sections that connect at the borders. If you’re new to graphic design, you might find it easier to place a single large photo across the canvas and then add text or design elements to each section. Another tip is to mark the boundaries of each 1080 x 1080 section so that when you cut them, each piece lines up perfectly.
Slice Your Images
Once you have your long design, you’ll need to split it into individual squares. Many photo-editing tools offer a slicing feature. Alternatively, you can manually crop the large canvas into equal squares, making sure you align them correctly. Label each image in the order they should appear in your carousel. This step is crucial because it ensures that your images line up properly when you upload them to Instagram.
Save Your Files
Save each square at the highest resolution possible to maintain image quality. Make sure the image format is compatible with Instagram. JPEG or PNG files usually work best. Pay attention to file size because Instagram has restrictions, although most standard designs will be within limits.
Upload and Arrange
Open Instagram on your phone, start a new post and click on the “Select Multiple” option. Choose your images in order, from slide one to slide ten, if you have that many. Make sure you keep them in the correct sequence.
Add Captions and Tags
Don’t forget about your caption. Use this space to give context, ask a question, or prompt your audience to swipe. You can also tag relevant accounts and add location details. Hashtags remain valuable for discovery, so include a few relevant tags if they suit your content.
Preview Before Posting
Double-check how the images line up by swiping through the preview. Make sure there are no unexpected gaps or mismatched lines. If something seems off, go back to your photo-editing software and adjust as needed.
Post and Engage
Hit that share button. Once your seamless carousel is live, interact with your audience as they comment and react to your content. Ask them questions or encourage them to guess what’s on the next slide. Engagement keeps your post visible and helps you build a deeper connection with your followers.
Conclusion
Now that you’ve got the knowledge, it’s time to make it happen. Just follow these steps, stay organized, and, above all, have fun. With a bit of practice, you’ll soon have a feed full of swiping wonders that make your profile feel like an immersive gallery. Go ahead and give it a try. Your next Instagram carousel might just be your favorite post yet!


More Stories
How Courts Evaluate Damages in Wrongful Death Cases
How Hiring A Slip and Fall Lawyer Las Vegas Maximizes Your Compensation
Are Handwritten Wills Legally Valid?