

When creating AI anime art, there are two main ways to approach an image: describe what you want from scratch with text-to-image, or start with an existing image and use image-to-image generation to develop it further. The choice largely comes down to whether you’re beginning with an idea or already have something visual to work with.
Platforms like PixAI give you access to both approaches, so you can start with text-to-image and move to image-to-image as your project develops. PixAI also offers Reference Pro, a model built around image inputs to make it easier to edit existing anime artwork with natural-language instructions.
Understanding how each approach works makes it easier to decide which one fits the job.
This guide compares text-to-image vs image-to-image and looks at what makes them different. We’ll also look at when to use each method, how prompts change between them, and how you can combine them to develop an AI anime image from the first idea to the finished artwork.
Text-to-image vs image-to-image
Text-to-image and image-to-image differ in where you start.
What is text-to-image generation?
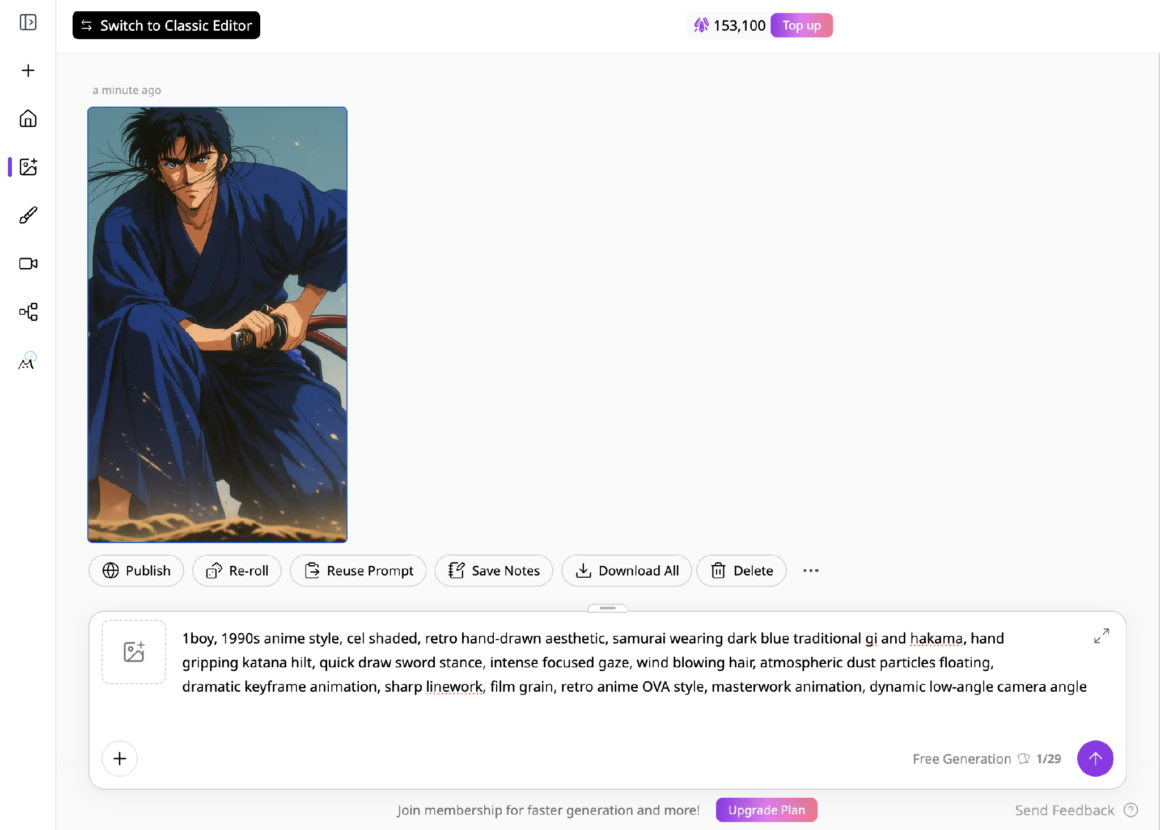
Text-to-image generation creates an image from a written prompt. You describe the character, setting, composition, style, and other details you want, and the AI uses those instructions to generate a new image.
This makes text-to-image a natural starting point when you’re working from an idea rather than an existing picture. You might describe a character’s appearance and outfit, place them in a specific environment, and include details such as lighting, camera angle, and mood.
The biggest advantage is the freedom to explore. You can experiment with new characters, settings, and concepts without needing an existing image to guide the generation. You can also generate several versions from the same idea and see which direction works best.
In PixAI, for example, you can start with a text prompt and generate an initial anime image before deciding whether to keep exploring with more text-to-image generations or move on to an image-to-image workflow.
What is image-to-image generation?
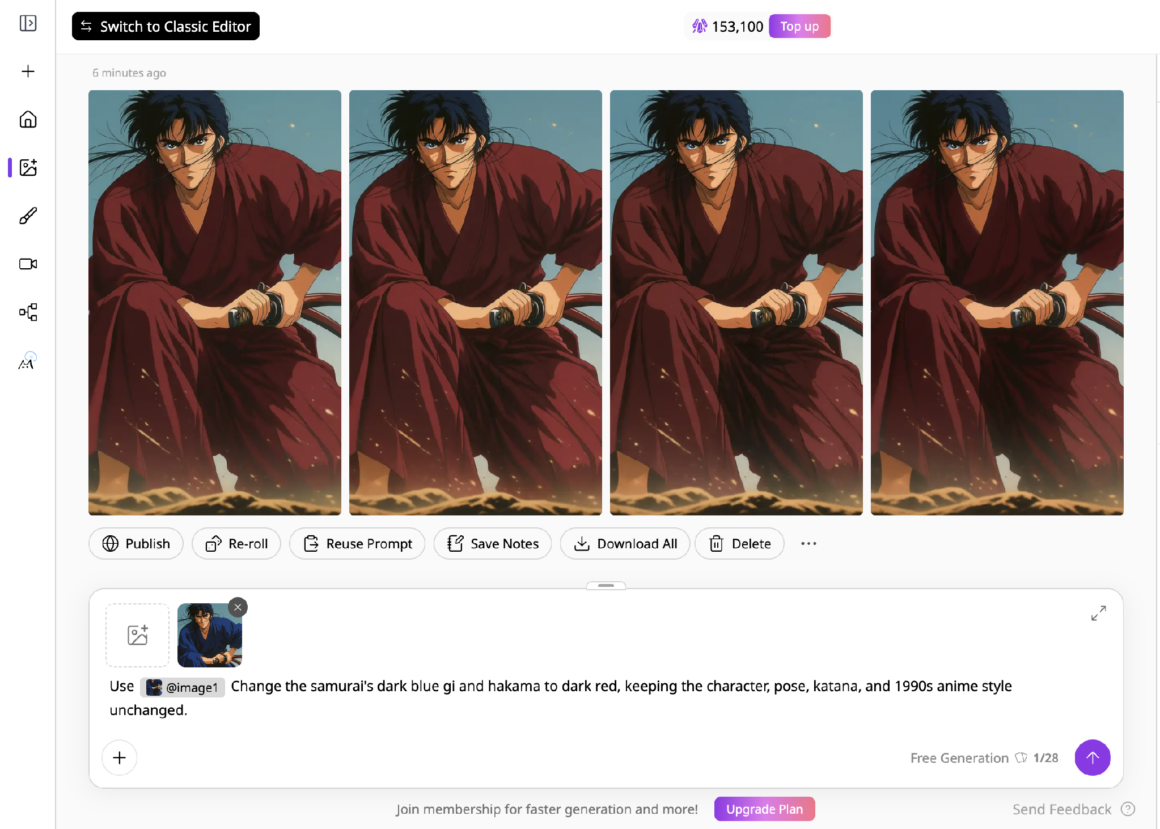
Image-to-image generation takes an existing image and uses it as the foundation for a new one. Instead of describing the entire image from scratch, you provide the original artwork and tell the model how you want it changed.
The original image can guide elements such as the character, composition, pose, colors, or overall visual style. Depending on the settings and model, the result can stay fairly close to the source or introduce much larger changes.
This makes Img2Img useful when you already have an AI anime image that works in some ways but needs development. You might want to create a variation of a character, change the atmosphere of a scene, adjust the composition, or take an early generation in a new direction without starting over.
In PixAI, you can use an external image or use the feature to develop an image you’ve created with text-to-image.
What is Reference Pro?
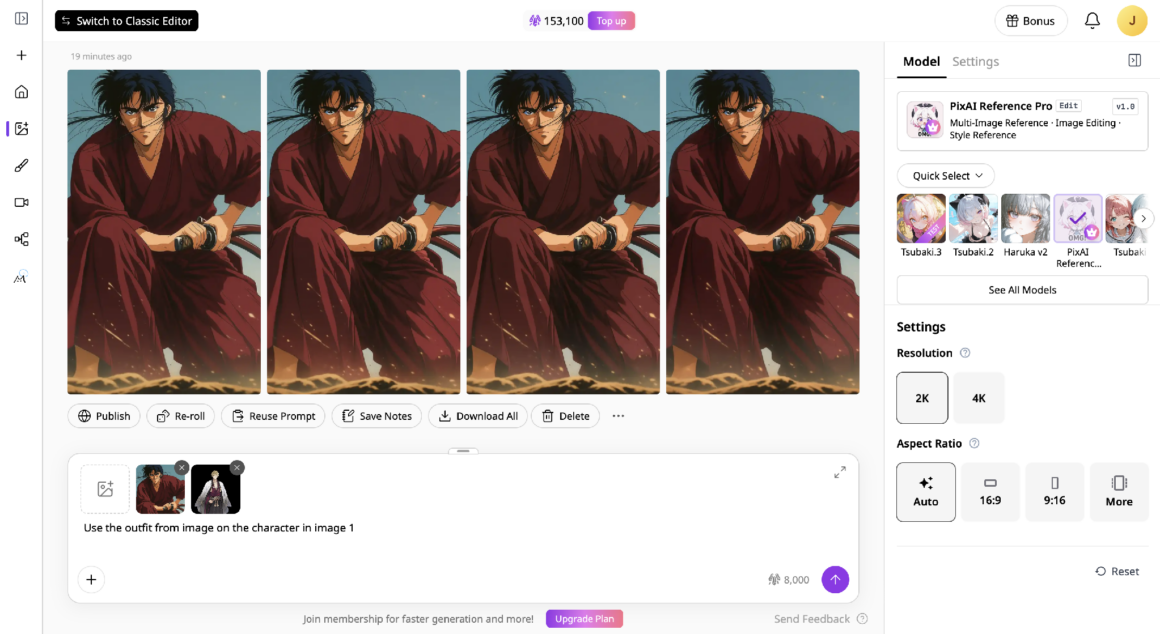
Reference Pro is a PixAI image-editing model built around reference images. Instead of starting with a text prompt alone, you upload one or more images and describe the changes you want in natural language. It can use the visual information in those references, such as a character, outfit, pose, composition, or style, while generating the edited result.
It’s designed specifically for working with image references. You can use an existing anime image as the foundation, then describe the changes you want in natural language. It can also work with multiple images, allowing you to combine visual information from different references in one generation.
When to use text-to-image
Text-to-image works best when you want the AI to create something from an idea.
Starting a new anime character
A new character is a natural starting point for text-to-image. You can describe their appearance, clothing, personality, and visual style without having to find a reference image that already matches your idea.
A prompt might describe a young fantasy courier with short blue hair, a cream-colored jacket, a leather satchel, and a confident expression. The model can interpret those details together and generate several versions of the character.
Generating multiple images also gives you room to explore. One version might have the right face, another might have better clothing, and a third might have a more interesting pose. Once you find a direction you like, you can take that image into an image-to-image workflow and develop it further.
Creating a new scene
Text-to-image is also useful when the setting itself is the main thing you’re exploring. You can describe the location, atmosphere, time of day, and characters you want in the frame, then generate different interpretations of the scene.
This works particularly well when you don’t already have artwork that captures the composition you want. A few changes to the prompt can produce a completely different setting, camera angle, or mood, giving you several directions to choose from before developing one further.
Exploring different concepts
When you’re still figuring out what you want to create, text-to-image gives you room to explore. You can change the character, setting, art style, composition, or mood between generations without being tied to an existing image.
This makes it a good way to explore several creative directions quickly. Once one of those ideas starts working, you can stop generating from scratch and use the resulting image as the foundation for further edits.
When to use image-to-image
Image-to-image becomes useful once you have an image worth developing. Rather than starting over with every change, you can use the existing artwork as the foundation and guide the next generation from there.
Developing an existing anime image
Image-to-image is useful when the first generation has the right overall direction but still needs work. You can use the image as a visual foundation and guide the next generation toward a more polished or different result.
A successful image might need a new pose, different lighting, a revised composition, or changes to the character’s appearance. Rather than rebuilding the entire scene in a new prompt, Img2Img lets you carry elements of the original into the next version while introducing the changes you want.
Controlling how much changes
Image-to-image has a control known as denoising strength, which determines how much freedom the model has to reinterpret the source image. Lower values keep the generation closer to the original, while higher values give the model more room to change it.
This lets you choose the degree of transformation based on what you’re trying to achieve. A subtle adjustment might call for a lower value, while a substantial change to the image can benefit from a higher one. Finding the right setting often comes down to generating a few variations and comparing how much of the original image remains.
Creating variations from a successful generation
A strong generation can give you a useful starting point for exploring other versions. Image-to-image lets you keep the core idea while experimenting with changes to the character, composition, lighting, or overall look.
This is particularly useful when one image gets most things right but you want to see what happens with a few different interpretations. Instead of repeatedly rebuilding the prompt and hoping for a similar result, you can work from the successful image and create a set of related variations.
When to use Reference Pro
Reference Pro is most useful when an existing image gives you the foundation you want, but you need more direct control over what changes and what stays the same.
Preserving a character while changing a particular aspect
Reference Pro works well when the character in an existing image is already close to what you want, but one part needs to change. You can describe the change while telling the model which parts of the character or image should remain consistent.
For example, you could keep a character’s face, hairstyle, and pose while changing their outfit. This gives you a more targeted way to develop the image without having to recreate the character from scratch.
Combining multiple references
Reference Pro can work with more than one reference image, which gives you a way to bring different visual elements into the same generation. One image might provide the character, while another supplies an outfit, pose, or other detail you want to incorporate.
You can then describe how those references should work together in your prompt. This makes the workflow useful when no single source image contains everything you want.
Using natural-language instructions
Reference Pro lets you describe the desired change in ordinary language rather than rebuilding the image through a long list of tags. You can explain what you want to preserve and then specify the change you want to make.
That makes it useful for more complex edits where several parts of the image need to work together. You can give the model a clear instruction about the character, reference images, and desired result instead of trying to control each element separately.
Prompts: Text-to-image vs Image-to-image vs Reference Pro
The prompt has a different job depending on where you are in the workflow. Text-to-image prompts establish what the AI should create, while image-to-image prompts guide how an existing image should change.
The biggest difference is what you’re asking the model to do with your instructions. A text-to-image prompt needs to describe the image you want to create. An Img2Img prompt can focus on the changes you want because the model already has an image to work from.
Reference Pro takes this further by letting you give more specific instructions about the relationship between the existing image, any additional references, and the final result.
Text-to-image prompts describe the image
A text-to-image prompt needs to give the model enough information to build the image from scratch. Ideally, you should describe the subject, setting, appearance, composition, lighting, mood, and other details that should appear in the final result.
The prompt might specify a silver-haired mage standing in an ancient library, surrounded by floating books and glowing magical symbols. Each detail helps establish what the model should include and how the finished scene should look.
Because there’s no existing image to guide the generation, the prompt carries most of the creative direction.
Example: 1girl, witch, long silver hair, dark green cloak, moonlit forest, glowing mushrooms, stone archway, full body, blue lighting, detailed anime style
Img2Img prompts describe the transformation
An Img2Img prompt can focus on what you want to change because the source image already provides much of the visual information. Instead of describing every element again, you can direct the model toward a different pose, setting, lighting, or visual treatment.
The more specific the intended change, the more useful the prompt becomes. You might ask for a character to turn toward the viewer, change from a daytime setting to nighttime, or shift the overall atmosphere while allowing the existing image to guide the result.
The prompt works alongside the source image rather than replacing it.
Example: Change the scene to a rainy evening with dark clouds and wet grass. Keep the character and overall composition similar.
Reference Pro prompts describe what to change
Reference Pro already uses the reference image as the foundation and maintains its visual information by default. Your prompt can therefore focus on the edit itself rather than describing the whole image again.
Natural-language instructions are enough to tell it what you want to change. You might ask it to change a character’s outfit, add an object to the scene, alter the lighting, or adjust a particular detail while the rest of the image remains intact.
This makes Reference Pro particularly useful for directed edits. Instead of rebuilding a description of the image, you can simply explain the change you want to see.
Example: Change her outfit to a red fantasy dress with gold details
How to choose between the three
The choice depends mainly on what you have to work with and how much of the image you want to change.
A useful workflow can move between these approaches as your image develops. You might create the initial artwork with text-to-image, use Img2Img to explore variations, and turn to Reference Pro when you have a specific change you want to make.
Final thoughts
Text-to-image and image-to-image are useful at different points in the creative process. Text-to-image gives you a way to turn an idea into an image, while Img2Img lets you take an existing result and develop it further. Reference Pro adds a more directed way to make changes when you want to work from an existing image or two.
PixAI brings these capabilities together, so you can move from an initial generation to variations and targeted edits as your project develops. Once you understand what each approach is good at, you can choose the one that fits the stage you’re at rather than trying to force every change through the same workflow.
More Stories
Why Nicotine and Caffeine Timing Can Matter for Your Daily Energy Levels
Can AI Become a Better Literature Reviewer Than Humans?
Behind on Taxes in Washington DC? A First-Steps Guide to the IRS and the OTR